My Project

This web server is running on a Raspberry Pi (Model B) powered 100% by Solar energy
Raspberry Pi

Why

Ever since I first heard about the project, I was very excited to buy and play around with a Raspberry Pi.  I wanted to come up with a fun project utilizing the Raspberry.  I decided to set it up as a server on the Internet and see how many years I could keep it running without a reboot.  For me, setting up a server with uptimes running for years is no trick. I decided to spice it up and run it using 100% solar power that I generate at my house, with no connection to the grid (not even for backup).


Buying the Raspberry Pi

Buying a Raspberry Pi is a lesson in patience.  To give you an idea of how long it takes to get one, I got on a waiting list around the first of the year.  On March 20, 2012 I was allowed to order it.  I finally got it on Friday the 13th of July 2012.  I wanted to buy the solar panel kit about a week before it was supposed to ship.  That would give me time to set it up and be ready once it came.  Of course the orginal shipping date got pushed back first by one week, and then by another two weeks.  In hindsight, I did not realize how much work I would need to do to create all of the backend applications and web content.  I should have spent more of the time I was waiting to better prepare.

Power Basic Math

Before I purchased my solar panels, I had to calculate the power requirements. I bought solar panels rated at 45 Watts based on these calculations.

45 Watts at 12 volts would be 3.72 Amps.  But this would be only the best case scenario, so for this math I used 3.5 amps.  To charge an 80AH battery using a 3.5 Amp charger, it would take 22.86 hours.  Of course there are losses, so my thoughts were that it would take 24 hours to charge the battery from dead to full.   That would be 24 hours of sun light.

The Raspberry Pi Model "B" requires a 700ma 5 Volt (3.5 Watts) power supply.  At 12 volts it would use 292ma. Of course, no voltage converter is perfect, so for calculations I used 350ma.  An 80AH 12 Volt battery should run the Raspberry Pi 228.5 hours before its dead.  Of course, the battery's voltage would drop off before it was totally dead, so it is hard to say just how long it would run it.  In a 24 hour period the Raspberry Pi would use 8.4AH of the 80AH battery.  So, the solar charger at 3.5 amps would need to change the battery at least 2.4 hours each day to stay even with the power usage of the Raspberry Pi.


Buying Solar Panels

I ended up picking the 45 Watt Solar Panel Kit from Harbor Freight.  The reason I chose it is because of the price.  I did my homework, and knew the kit wasn't the best quality.  Since I am only using it for this project, I did not want to spend a ton of money on a real solar kit.  The kit is also complete with everything I needed except the battery.  Lucky for me, I had a battery laying around that I could use for the project.  If I had to, I could replace any part of this system without any downtime, as long as I have good monitoring in place.  If the battery starts to die off and not hold a charge, I can hook one in parallel and then remove the bad battery.  If the panels or charging unit dies then I will have a day or so to come up with something while the server runs on battery power.  There are single points of failures, but the same is true of the Raspberry and its one SD card.


Installing the Panels


Raspberry Pi

Raspberry Pi
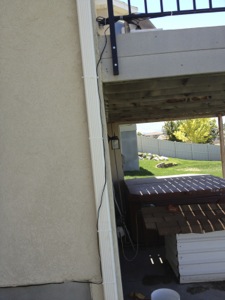
The panels needed to be outside in the sun.  I have a nice house and a wife I love, so I did not want to start drilling holes in the roof or do something to cause her (or the neighbors) to freak out.  Also, this was a cheap "for the fun of it" project and I did not want scope creep to take over.  The back of my house faces west, and we have a big deck.  I decided set up the panels on the deck facing west.  I cable tied it in place so I did not have to drill any holes in the deck or railings.  I then cable tied the wiring along the bottom of the rails, down a gutter down spout, and along the bottom of the stucco siding.  I lucked out because the stucco siding had a tin rail running under it with stamped holes in it.  Every so many feet I put in a screw and cable tied the cord to it.  The twelve volt cord that came with the panels (between panels and regulator) was only so long so I put a regular female extension cord plug on it and for the rest of the length. I used a standard extension cord I already owned.  I wanted all the electronics in my datacenter in the house (I also have a LAN center in my house but that is another story).  I used an old, but good quality extension cord that had already been cut for another reason years ago.  Extensions cords work great as dirt cheap durable wiring. Once inside the house, I terminated the connection on the regulator.

Raspberry Pi

Raspberry Pi

Monitoring Power


Raspberry Pi

Raspberry Pi

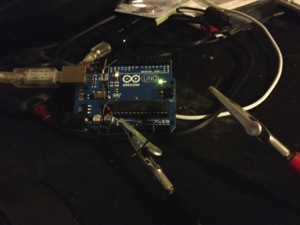
I decided to buy an Arduino Uno to go along with the Raspberry so I could use it's inputs and serial output to monitor the voltages.  I used RRD tools to graph the voltages and Xymon to monitor and send alerts, if something goes wrong.  The Arduino is connected directly to the Raspberry so it can collect the data. There is just so much you squeeze out of the limited resources of the Raspberry Pi, so I'm running RRD tools on a different server.  In addition, I did not want to run an external HD connected to the Raspberry. I wanted the Raspberry run 100% off solar power and I thought the HD would use too much.  I wasn't sure if the Raspberry's SD card would handle the constant rewrites of RRD tools.  Both the Raspberry Pi and the Arduino run off the solar power.

For the Arduino case, I used an Altoids tin.  I used part of a foam pad that came under a new mother board between the board and the tin, and used little screws to secure the Arduino in place.  I used some resistors I had laying around and programed the Arduino to send the calculated voltages out the serial so I can read them using the Pi.


Raspberry Pi

Raspberry Pi

Raspberry Pi Case


Raspberry Pi

Raspberry Pi

For the Raspberry Pi case, I got my dad's help (using his awesome wood shop).  I decided to make it out of wood because I knew he had all the right tools and knowledge to use them.  We tried making the case before I had the Raspberry using printouts and measurements on the Internet, but it did not work out.  Once I got it we were able to make it in one afternoon.  I decided to cut out the red parts of the Raspberry image on top so you could still see the board through the holes.  My mom painted the leafs and the black parts of the image.  The box spilts in half so you can remove or install the board.

My dad made the comment when he was helping me "It's not like any one else in the world is going to see it."  A few seconds later he said "Wait… you're putting this on the Internet for all the world to see."

Raspberry Pi

Raspberry Pi

Building the Pi Server


I'm using the Debian Squeeze image that is recommended for the Pi.  It was clear from the start that this image is for an end user desktop setup and not a server.  Not a big deal for me.  I had a blast figuring out all the ins and outs of the default configuration, from repartitioning the SD card, modifying the default setup, to installing the software I needed.  It's been a while since I had to dig in and do tasks the hard/fun way.  Back in the day if you were running Linux, then you knew Linux/Unix.  Remember installing Slackware Linux using floppies?  Nowadays most Linux distributions just do everything for you, with GUI's no different then other main stream OS's.  Not that it's a bad thing (because it allows the general public to run them).  It's just fun to have to figure things out again.

For the web server I wanted to use Nginx however the Pi kept locking up while it was running so I had to move on.  I have years of experience running Apache (httpd), lighttpd, mathopd, and nginx.  Apache is a little overkill for this project and the server's resources, so I needed to use one of the more lightweight servers.  I ended up using lighttpd which has been running like a champ.